

Playing Soundfonts with the Web Audio API
March 19, 2023

In this post, I want to implement a way to load and play soundfonts with the Web Audio API.
Notes from the future: This post is originally from July 2022, but I never released it..
About Soundfonts and General MIDI
To get the whole story check out Soundfonts on Wikipedia. Essentially, soundfonts are for sound what normal fonts are for typography: A collection of interchangeable sounds that can be used to play different types of music.
The so called General MIDI specification (GM) is a standard set of sounds that a soundfont should have. You might know those from any old keyboard with 128 (or more) programs.
Besides General MIDI, the file format sf2 can also contain any collection of sounds, unrelated to GM. They were quite popular in computer games, when file sizes were limited.
The fact that soundfonts are not huge, and also because there are many soundfonts floating around, I think they are a good fit to be used on the web.
Loading Soundfonts
Luckily, other people have already figured out how to parse sf2 files on the web. After some digging, I found the lib soundfont2 being the best option:
import { SoundFont2 } from 'soundfont2';

async function loadSoundfont(url) {
  // load some sf2 file into an array buffer:
  const buffer = await fetch(url).then((res) => res.arrayBuffer());
  // convert buffer to Uint8Array:
  const data = new Uint8Array(buffer);
  // parse the sf2 file:
  return SoundFont2.from(data);
}
// let's try it out:
loadSoundfont(
  'https://raw.githubusercontent.com/felixroos/felixroos.github.io/main/public/Earthbound_NEW.sf2'
).then((font) => {
  console.log('font loaded', font);
});
What comes back is a huuuuuge object containing all the soundfont data! The top level properties are:
- banks
- chunk
- instruments
- metaData
- presetData
- presets
- sampleData
- samples
The SF2 Onion
So there is a whole lot of different data types in there. So far, I am too lazy to read the spec, but the general structure looks like this:
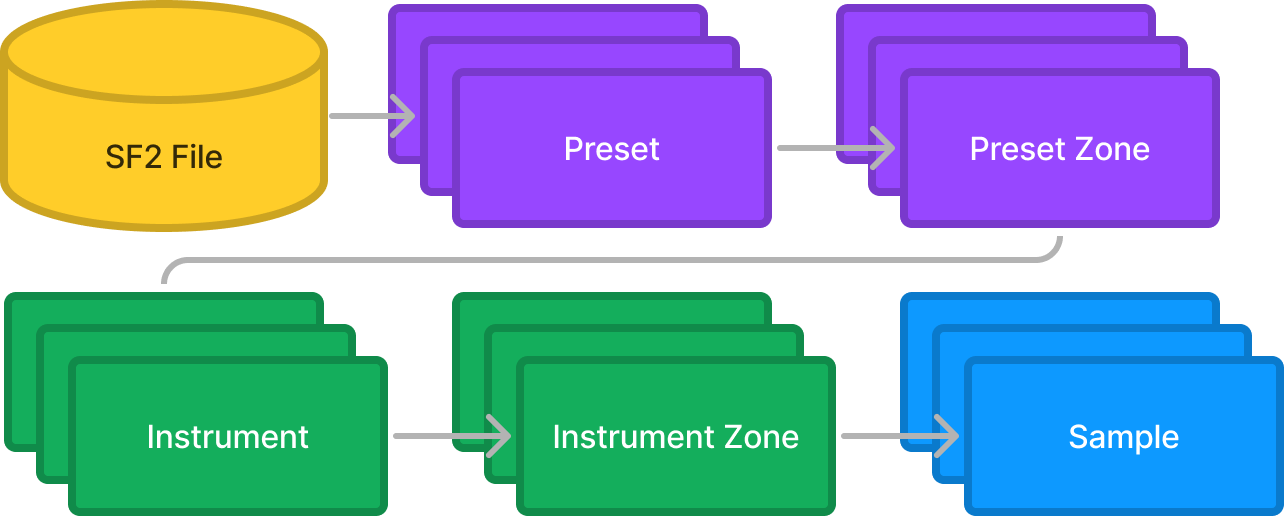
I think the best idea to understand all of this is to work through layer by layer
Playing Samples
In the diagram, we can see the samples are the smallest entity of the system. Why not list all available samples and make them playable first?
The Sample Object
A sample object returned from the parser looks like this:
{
  "data": [
    /* Lots of values between -32768 and 32768 */
  ], // Int16Array
  "header": {
    "name": "accordian 2",
    "start": 6142, // first sample
    "end": 9758, // last sample
    "startLoop": 9566, // loop begin
    "endLoop": 9758, // loop end
    "sampleRate": 32000, // samples / second
    "originalPitch": 64, // midi number
    "pitchCorrection": -19, // cents
    "link": 0, // ?
    "type": 1 // ?
  }
}
Here we see an important feature of soundfonts: loop points! These allow notes to sustain endlessly while the file size can remain small.
Getting the Buffer Source
The get a playable AudioBufferSourceNode from a sample object, I did the following:
export function getBufferSourceFromSample(ctx, sample, pitch) {
  const { header, data: int16 } = sample;
  // convert Int16Array to Float32Array:
  const float32 = new Float32Array(int16.length);
  for (let i = 0; i < int16.length; i++) {
    float32[i] = int16[i] / 32768; // convert to [-1, 1]
  }
  const buffer = ctx.createBuffer(1, float32.length, header.sampleRate);
  const channelData = buffer.getChannelData(0);
  channelData.set(float32);
  const source = ctx.createBufferSource();
  source.buffer = buffer;
  // calculate playbackRate
  const baseDetune =
    header.originalPitch - header.pitchCorrection / 100.0 - zone.fineTune;
  const playbackRate =
    1.0 * Math.pow(2, (100.0 * (pitch - baseDetune)) / 1200.0);
  source.playbackRate.value = playbackRate;
  // set loop!
  if (header.endLoop > header.startLoop) {
    const loopStart = header.startLoop - header.start;
    source.loopStart = loopStart / header.sampleRate;
    source.loopEnd = (header.endLoop - header.start) / header.sampleRate;
    source.loop = true;
  }
  return source;
}
Playing the Sample
To conveniently start and stop the sample without pops, I used this function:
export const startSample = (ctx, sample, pitch, time = ctx.currentTime) => {
  let source = getBufferSourceFromSample(ctx, sample, pitch);
  let gain = ctx.createGain();
  gain.connect(ctx.destination);
  source.connect(gain);
  source.start(time);
  // return stop handle
  return () => {
    if (!gain || !source) {
      // already stopped / not started
      return;
    }
    const end = ctx.currentTime + 0.1; // fade out
    gain.gain.linearRampToValueAtTime(0, end);
    source.stop(end);
    source = undefined;
    gain = undefined;
  };
};
Result
Throwing all of that together, we can listen to all samples of the sf2 file!
And there we go! The core entity of the soundfonts seems to work, what's left is all the onion layers around..
Instruments
Let's peel the next layer: Instruments are a collection of samples:
Properties
Here is an example of an instrument object:
{
  "header": {
    "bagIndex": 0,
    "name": "Boombox Kit"
  },
  "zones": [
    {
      "keyRange": { "lo": 48, "hi": 51 }, // can also be undefined
      "generators": {
        "43": { "id": 43, "range": { "lo": 48, "hi": 51 } },
        "53": { "id": 53, "amount": 32 },ƒ
        "58": { "id": 58, "amount": 65 }
      },
      "modulators": {}, // i have yet to find an instrument with something in here
      "sample": {
        /* sample object */
      }
    }
    /* more zones */
  ]
}
So basically, each instrument has one or more zones where each contains a sample for a specific key range. Each zone can also define generators and modulators, whatever that is...
Generators
At this point, I have to find out what those generators are, by looking at the spec. We can find out what those numbers mean in the Section "8.1.2 Generator Enumerators Defined":
const generators = {
  // sample control
  0: 'startAddrsOffset', // moves sample start point
  1: 'endAddrOffset', // moves sample end point
  // loop control
  2: 'startloopAddrsOffset', // moves loop start point
  3: 'endloopAddrsOffset', // moves loop end point
  4: 'startAddrsCoarseOffset', // ?
  // pitch modulation
  5: 'modLfoToPitch', // modulation lfo pitch modulation in cents
  6: 'vibLfoToPitch', // vibrato lfo pitch modulation in cents
  7: 'modEnvToPitch', // modulation envelope pitch modulation in cents
  // filter
  8: 'initialFilterFc', // lowpass filter cutoff in cents
  9: 'initialFilterQ', // lowpass filter resonance
  // filter modulation
  10: 'modLfoToFilterFc', // modulation lfo lowpass filter cutoff in cents
  11: 'modEnvToFilterFc', // modulation envelope lowpass filter cutoff in cents
  //
  12: 'endAddrsCoarseOffset', // ?
  13: 'modLfoToVolume', // modulation lfo volume (tremolo), where 100 = 10dB
  14: 'unused1',
  15: 'chorusEffectsSend', // how much is sent to chorus 0 - 1000
  16: 'reverbEffectsSend', // how much is sent to reverb 0 - 1000
  17: 'pan', // panning, where -500 = left, 0 = center, 500 = right
  18: 'unused2',
  19: 'unused3',
  20: 'unused4',
  // mod lfo
  21: 'delayModLFO', // delay for mod lfo to start from zero (weird scale)
  22: 'freqModLFO', // frequency of mod lfo, 0 = 8.176Hz, unit: f => 1200log2(f/8.176)
  // vib lfo
  23: 'delayVibLFO', // delay for vibrato lfo to start from zero (weird scale)
  24: 'freqVibLFO', // frequency of vibrato lfo, 0 = 8.176Hz, unit: f => 1200log2(f/8.176)
  // mod env
  25: 'delayModEnv', // 0 = 1s declay till mod env starts
  26: 'attackModEnv', // attack of mod env
  27: 'holdModEnv', // hold of mod env
  28: 'decayModEnv', // decay of mod env
  29: 'sustainModEnv', // sustain of mod env
  30: 'releaseModEnv', // release of mod env
  31: 'keyNumToModEnvHold', // also modulating mod envelope hold with key number
  32: 'keyNumToModEnvDecay', // also modulating mod envelope decay with key number
  // vol env
  33: 'delayVolEnv', // delay of envelope from zero (weird scale)
  34: 'attackVolEnv', // attack of envelope
  35: 'holdVolEnv', // hold of envelope
  36: 'decayVolEnv', // decay of envelope
  37: 'sustainVolEnv', // sustain of envelope
  38: 'releaseVolEnv', // release of envelope
  39: 'keyNumToVolEnvHold',
  40: 'keyNumToVolEnvDecay',
  // zone
  41: 'instrument', // instrument index to use for preset zone
  42: 'reserved1',
  43: 'keyRange', // key range for which preset / instrument zone is active
  44: 'velRange', // velocity range for which preset / instrument zone is active
  45: 'startloopAddrsCoarseOffset', // ?
  46: 'keyNum', // instrument only: always use this midi number (ignore whats pressed)
  // gain
  47: 'velocity', // instrument only: always use this velocity (ignore whats pressed)
  48: 'initialAttenuation', // allows turning down the volume, 10 = -1dB
  49: 'reserved2',
  50: 'endloopAddrsCoarseOffset', // ?
  // tune
  51: 'coarseTune', // pitch offset in semitones
  52: 'fineTune', // pitch offset in cents
  // sample
  53: 'sampleID', // instrument zone only: which sample to use
  54: 'sampleModes', // 0 = no loop, 1 = loop, 2 = reserved, 3 = loop and play till end in release phase
  55: 'reserved3',
  56: 'scaleTuning', // the degree to which MIDI key number influences pitch, 100 = default
  57: 'exclusiveClass', // = cut = choke group
  58: 'overridingRootKey', // can override the sample's originalPitch
  59: 'unused5',
  60: 'endOper',
};
This is quite a list, though I am not sure if it makes sense to implement all of those.
To simplify things a little bit, let's loosely categorize them:
- buffer source
- 0: 'startAddrOffset', // moves sample start point
- 1: 'endAddrOffset', // moves sample end point
- 2: 'startloopAddrsOffset', // moves loop start point
- 3: 'endloopAddrsOffset', // moves loop end point
- 4: 'startAddrsCoarseOffset', // ?
- 12: 'endAddrsCoarseOffset', // ?
- 45: 'startloopAddrsCoarseOffset', // ?
- 50: 'endloopAddrsCoarseOffset', // ?
- 54: 'sampleModes', // 0 = no loop, 1 = loop, 2 = reserved, 3 = loop and play till end in release phase
- 57: 'exclusiveClass', // = cut = choke group
- buffer playbackRate
- 51: 'coarseTune', // pitch offset in semitones
- 52: 'fineTune', // pitch offset in cents
- 5: 'modLfoToPitch', // modulation lfo pitch modulation in cents
- 6: 'vibLfoToPitch', // vibrato lfo pitch modulation in cents
- 7: 'modEnvToPitch', // modulation envelope pitch modulation in cents
- 46: 'keyNum', // instrument only: always use this midi number (ignore whats pressed)
- 56: 'scaleTuning', // the degree to which MIDI key number influences pitch, 100 = default
- 58: 'overridingRootKey', // can override the sample's originalPitch
- filter
- 8: 'initialFilterFc', // lowpass filter cutoff in cents
- 9: 'initialFilterQ', // lowpass filter resonance
- 10: 'modLfoToFilterFc', // modulation lfo lowpass filter cutoff in cents
- 11: 'modEnvToFilterFc', // modulation envelope lowpass filter cutoff in cents
- gain
- 13: 'modLfoToVolume', // modulation lfo volume (tremolo), where 100 = 10dB
- 47: 'velocity', // instrument only: always use this velocity (ignore whats pressed)
- 48: 'initialAttenuation', // allows turning down the volume, 10 = -1dB
- effects
- 15: 'chorusEffectsSend', // how much is sent to chorus 0 - 1000
- 16: 'reverbEffectsSend', // how much is sent to reverb 0 - 1000
- 17: 'pan', // panning, where -500 = left, 0 = center, 500 = right
- lfos
- 21: 'delayModLFO', // delay for mod lfo to start from zero (weird scale)
- 22: 'freqModLFO', // frequency of mod lfo, 0 = 8.176Hz, unit: f => 1200log2(f/8.176)
- 23: 'delayVibLFO', // delay for vibrato lfo to start from zero (weird scale)
- 24: 'freqVibLFO', // frequency of vibrato lfo, 0 = 8.176Hz, unit: f => 1200log2(f/8.176)
- mod envelope
- 25: 'delayModEnv', // 0 = 1s declay till mod env starts
- 26: 'attackModEnv', // attack of mod env
- 27: 'holdModEnv', // hold of mod env
- 28: 'decayModEnv', // decay of mod env
- 29: 'sustainModEnv', // sustain of mod env
- 30: 'releaseModEnv', // release of mod env
- 31: 'keyNumToModEnvHold', // also modulating mod envelope hold with key number
- 32: 'keyNumToModEnvDecay', // also modulating mod envelope decay with key number
- vol envelope
- 33: 'delayVolEnv', // delay of envelope from zero (weird scale)
- 34: 'attackVolEnv', // attack of envelope
- 35: 'holdVolEnv', // hold of envelope
- 36: 'decayVolEnv', // decay of envelope
- 37: 'sustainVolEnv', // sustain of envelope
- 38: 'releaseVolEnv', // release of envelope
- 39: 'keyNumToVolEnvHold',
- 40: 'keyNumToVolEnvDecay',
- zone
- 41: 'instrument', // instrument index to use for preset zone
- 43: 'keyRange', // key range for which preset / instrument zone is active
- 44: 'velRange', // velocity range for which preset / instrument zone is active
Presets
So far, we've looked at samples, instruments and instrument zones. Let's look at the last 2 layers of the onion: presets and preset zones.
Here we see that each preset can have one or multiple zones containing an instrument. Like with instrument zones, each preset zone can define generators to set certain properties:
{
  "header": {
    "name": "FM Carillion",
    "preset": 1,
    "bank": 0,
    "bagIndex": 594,
    "library": 0,
    "genre": 0,
    "morphology": 0
  },
  "zones": [
    {
      "generators": {
        "41": {
          "id": 41,
          "amount": 236
        }
      },
      "instrument": {
        /*instrument object */
      },
      // "keyRange": undefined,
      "mondulators": {}
    }
  ]
}
From Note on to Sound
After knowing the structure of a soundfont, let's think about what happens when we play a note.
- Select a preset
- Press a key (defines midi number + velocity)
- Use all preset zones with matching keyRange and velRange
- For each active preset zone, decide which instrument zones to use, based on keyRange and velRange
- Play the sample of each active instrument zones
- Shape the sound using the generators of the preset zone, as well as the instrument zone
I made these steps up, without checking the spec, but I think this is the way it should work. We will find out later...
Let's now implement each of those steps!
Demo
In the following demo, you can press a key on the piano and the soundfont player will play the appropriate sound, using the steps outlined above:
Because this got a little more involved, I started a library called sfumato. You can check out the source code there! I will probably write another post about soundfonts in the future. It also has a separate Demo.